Have you been dreaming of a Spring clean slate but can’t or won’t spend too much on lighting? Despite being crucial to any given room, not everyone can afford to buy a designer pendant or a majestic lamp (yes, this week we’re primarily talking about ceiling lamps!). Luckily for you, we have searched the web and put together what we think are the top 5 suggestions for DIY chandeliers. If you are great with handwork, you will certainly need to activate your crafter skills. If not, do not fear! We have chosen a few straightforward ideas, for those of you who love handmade neat things but are not great at handiwork.
don’t miss out on: 5 inexpensive pendant lighting ideas for a spring renovation

Here’s a thought: Easter is coming and school is over for almost every child. If you don’t want to leave them playing videogames or plugged to their tablets or iPads, you could have a homely lamp-workshop! As long as it doesn’t take too much of their time, kids love handiwork. Maybe there are even a few suggestions perfect for them. And who doesn’t like to create things with their bare hands and then come up with something magnificent? Scroll down to read all about our amazing tips!

the sweetest thing
Well, we know how much you love charming eye-catching lighting fixtures, with intricate patterns and complex shapes. We present to you: the paper orb chandelier. You will need: 1 regular white paper lantern; 100-125 paper cupcake liners; 1 lighting cord; glue.

If you want, you can choose to use paper cupcake liners with patterns or stripes, or even glue the designed cupcake liners inside of the plain white bigger ones, as is shown in the photos! Assemble the paper lantern, glue the paper liners all around the structure, gently manipulate the paper into whichever shape you like, drop the light in and voilà!

inspiration and photos | Design Sponge
knitted cotton cloud
This DIY idea is perfect for a baby bedroom. So, if you have a cute little one, it is impossible not to love this doily lamp. You will need: a big balloon; doilies, or crochet cloths; white glue and a bulb with a long colorful cord.

Fill the balloon, soak the doilies in white glue and paste them on top of the balloon, let it dry for at least a night, the next day poke the balloon, remove the remainder and place the bulb inside the elaborate shade! It has a homely look and sheds a kaleidoscopic light. It is perfect for a cottage or rustic home. Be careful! Choose a cold bulb, otherwise the hotness can interfere with the glue.

inspiration and photos | Dos Family
light in a jar
Are you one of those lucky ones, whose mother or grandma still makes jam and jelly, and so you have loads of mason jars at home? Well, now they don’t have to stay in a dusty cellar evermore. The mason jar chandelier is just the thing for you!
Mason jars can serve a number of purposes. You can even choose from candle or electric chandeliers, both will be impressive! And, the best thing is: since the jars are individual, you can choose how to arrange them! Here are a few ideas:

incredible mason jar chandelier from East Coast Creative
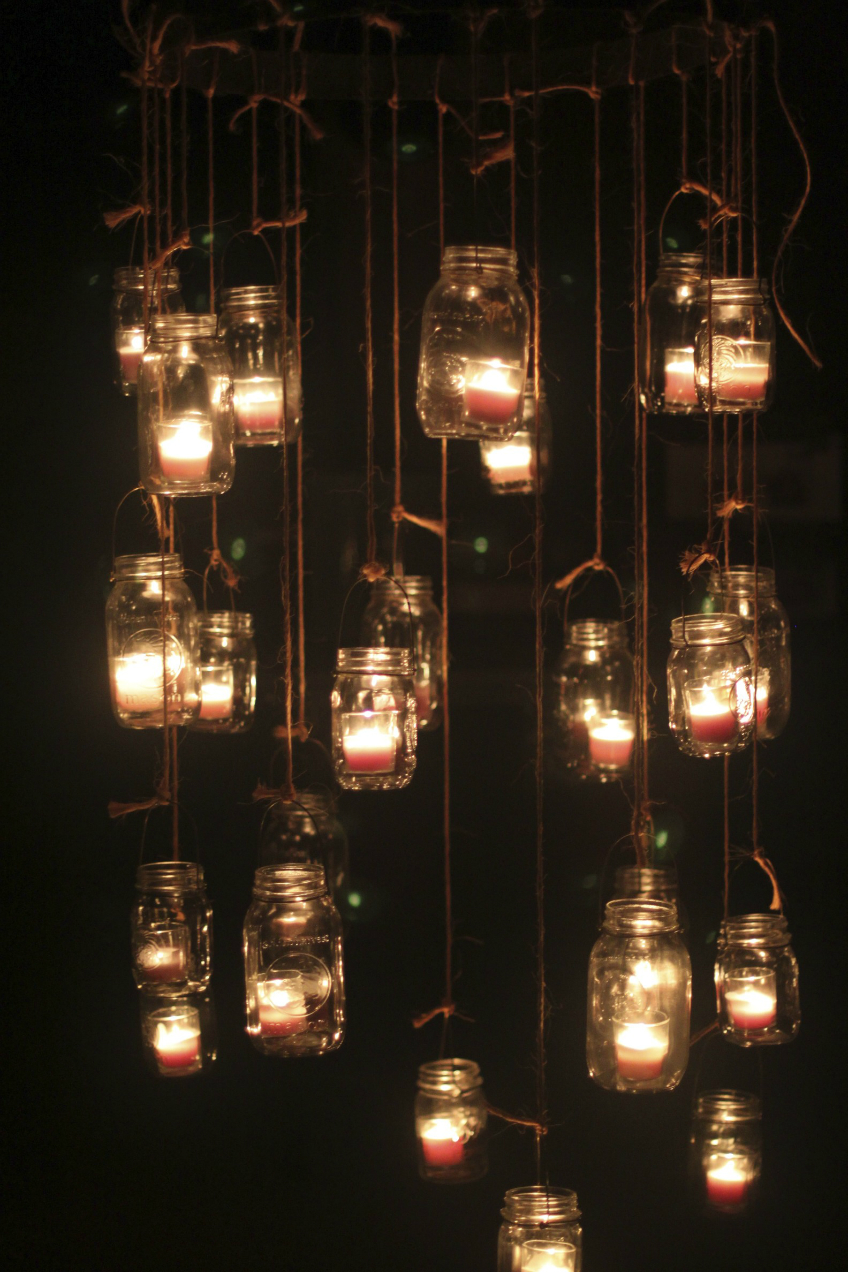
amazing mason jar candle chandelier at instructables platform

yummy gummy
This one will most certainly be the one your kids want to help you with! The candy of their eye: the gummy bear chandelier! Sadly, the gummy bears are made of acrylic, so your kids won’t be able to eat them. But you can always buy two bags of gummy bears: the edible kind and the plastic kind…

Well, this might take a while. Thread all the gummy bears with a sort of transparent fishing line, attach them to a wooden or hard structure, and there you go! A yummy chandelier!

created by Kevin Champeny
go green
In this day and age, it is crucial that your kids know about recycling and protecting the environment. As all of us know, plastic is one of the most harmful things there is. So, here’s designer Ed Chow’s idea for what to do with Tetra Pak boxes!

Cut your milk carton into stripes, make triangles, paste the smaller triangles into hexagons or pentagons and, afterwards, shape a huge and complex globe pendant. The outcome: a wonderful caged tetralamp!

created by Ed Chew
spoon it!
Last but not least, the amazing plastic spoon lamp. You will not believe it, but this lamp is made out of carboy and plastic spoons. Take a regular 5 liter carboy, cut its bottom, also cut the cable off the plastic spoons, keeping only the round part. Start glueing the spoon heads from bottom to top, a line at a time. Afterwards, don’t forget to complete the bottleneck!

Don’t forget to place a bulb inside the shade. Again: choose a cold bulb, for the hotness can interfere with the glue. The chandelier is most impressive and sophisticated!

created by Yaroslav Olenev | photos and instructions at Future Now
if you enjoyed this article, read also: Spring fever: wondrous outdoor lighting for 2017
Find out all about this Spring’s lighting inspirations and the best lighting stores with DelightFULL‘s latest Interior Design Trends: Spring 2017 e-book! Visit us also on Pinterest and do not forget to come by us everyday, we will have the best lighting suggestions for you and your home!